C
Develop the Application Backend (RH850)
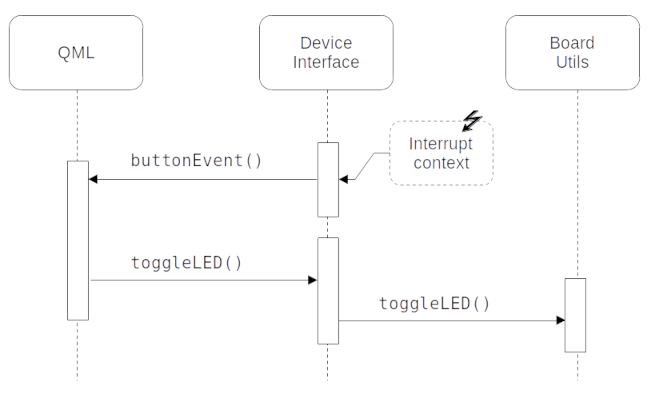
This topic guides you through the steps to create and build the application's backend using GHS MULTI IDE. The backend enables the application's UI to communicate with the platform and get the required information from the hardware. In this case, the device interface gets the status of the on-board user button. The following diagram describes the interaction between the two components:
Export application and platform sources
This section provides you step-by-step instructions to create a GHS MULTI IDE project, and integrate application and platform sources exported by the Qt for MCUs tools.
- Export the UI sources using the
qmlprojectexportertool. Create a batch script with the following commands:set QUL_ROOT=C:\path\to\QtMCUs\2.4.0 set QMLPROJECT_FILE=C:\path\to\YourProject.qmlproject set BOARDDEFAULTS=%QUL_ROOT%\platform\boards\renesas\rh850-d1m1a-baremetal\cmake\BoardDefaults_32bpp.qmlprojectconfig set APPLICATION_EXPORT_DIR=application-sources %QUL_ROOT%\bin\qmlprojectexporter.exe %QMLPROJECT_FILE% --platform=rh850-d1m1a-baremetal --toolchain=GHS --boarddefaults=%BOARDDEFAULTS% --outdir=%APPLICATION_EXPORT_DIR%
Make sure to set all the relevant paths (
QUL_ROOTandQMLPROJECT_FILE) and run the script from the Command Prompt. The C++ sources generated from QML will now be in%APPLICATION_EXPORT_DIR%. For more information, refer to qmlprojectexporter documentation. - Export the platform sources and generate a top-level GHS project file using the
platformexportertool. Create a batch script with the following commands:set QUL_ROOT=C:\path\to\QtMCUs\2.4.0 set PLATFORM_EXPORT_DIR=platform-sources set RGL_DIR=C:\path\to\rgl_ghs_D1Mx_obj_V.2.0.0a %QUL_ROOT%\bin\platformexporter.exe --infile=%QUL_ROOT%\lib\QulPlatformTargets_rh850-d1m1a-baremetal_32bpp_Windows_ghs-export.json --outdir=%PLATFORM_EXPORT_DIR% --sdkdir=%RGL_DIR% --outputformat=ghs --includeIDEgeneratedHWCode
Make sure to set
RGL_DIRto the Renesas Graphics Library (RGL) 2.0.0a install path, and run the script. The script exports the platform sources in%PLATFORM_EXPORT_DIR%\platformand creates a top-level project file and sub-project files for GHS MULTI IDE in%PLATFORM_EXPORT_DIR%. The generated GHS project includes the following:%PLATFORM_EXPORT_DIR%\project.gpj: the top-level project file%PLATFORM_EXPORT_DIR%\prj\program.gpj: program compile definitions, include directories, compiler and linker options%PLATFORM_EXPORT_DIR%\prj\drivers.gpj: list of RGL sources%PLATFORM_EXPORT_DIR%\prj\platform.gpj: list of RH850-D1M1A platform sources%PLATFORM_EXPORT_DIR%\prj\application.gpj: a convenience empty sub-project for the application which you will edit in the next section
For more information, refer to the platformexporter documentation.
Build application in GHS MULTI IDE
The following instructions guide you through the GHS project adaptation steps needed to build the application:
- Launch GHS MULTI IDE
- Select File > Open Project and select the top-level
project.gpjfile exported in the earlier section. - Create a new file named
main.cppin any directory, which you will refer to as BACKEND_DIR:#include "YourProject.h" #include <qul/application.h> #include <qul/qul.h> int main() { Qul::initHardware(); Qul::initPlatform(); Qul::Application app; static YourProject item; app.setRootItem(&item); app.exec(); return 0; }
This contains the default entrypoint for the application. You will extend this entrypoint later with extra configuration steps to use the LED and user button. Refer to the entry point to Qt Quick Ultralite applications for more information. Make sure to use the same project name (YourProject) that you chose in the earlier chapter.
- Right-click
application.gpjand select Edit to add the application sources that you exported in the earlier section, and the source file you created in the earlier step. Replace its contents with the following:#!gbuild macro APPLICATION_EXPORT_DIR=C:/path/to/application-sources/ macro BACKEND_DIR=C:/path/to/backend [Subproject] -DQUL_STD_STRING_SUPPORT -I${APPLICATION_EXPORT_DIR} # ----- UI ----- ${APPLICATION_EXPORT_DIR}/resources/qulrcc_assets.cpp ${APPLICATION_EXPORT_DIR}/resources/qulrcc_lookup_data.cpp ${APPLICATION_EXPORT_DIR}/resources/qulrcc_runtime_allocation_info.cpp ${APPLICATION_EXPORT_DIR}/YourProject.cpp ${APPLICATION_EXPORT_DIR}/Screen01.cpp ${APPLICATION_EXPORT_DIR}/loader_item_allocator.cpp ${APPLICATION_EXPORT_DIR}/qul_font_engines.cpp ${APPLICATION_EXPORT_DIR}/qul_font_data.cpp # ----- backend ----- ${BACKEND_DIR}/main.cppMake sure to set the
APPLICATION_EXPORT_DIRmacro to the directory containing the exported sources from the earlier section. In general, you should add all the C++ source files exported by the qmlprojectexporter as part of this step. The%APPLICATION_EXPORT_DIR%\config\YourProject.1.compiler_outputs.txtfile has the full list of sources.Similarly, set the
BACKEND_DIRmacro to the directory containingmain.cpp. - Set the application binary name using
-o YourProject.elfin theprogram.gpjproject file. - Finally, the
%APPLICATION_EXPORT_DIR%\config\YourProject.1.libraries.txtfile lists the Qt Quick Ultralite libraries that an application should link against. For example, it might list these libraries:- Qul::MonotypeUnicode
- Qul::MonotypeUnicodeEngineShaperDisabled
- Qul::PNGDecoderNull
Identify the corresponding libraries for your build type and platform in the
${QUL_DIR}/libfolder and add them toprogram.gpjwith the-ldirective. For the example libraries listed above, these are the corresponding library files to link against inprogram.gpj:-l${QUL_DIR}/lib/libQulMonotypeUnicode_rh850-d1m1a-baremetal_Windows_ghs_MinSizeRel.a-l${QUL_DIR}/lib/libQulMonotypeUnicodeEngineShaperDisabled_rh850-d1m1a-baremetal_Windows_ghs_MinSizeRel.a-l${QUL_DIR}/lib/libQulPNGDecoderNull_rh850-d1m1a-baremetal_Windows_ghs_MinSizeRel.a
- At this point, in order to verify that the steps so far have been followed correctly, you can build and flash your partially implemented application to the RH850 board to run it on the target hardware.
In the next section, you will add the low-level logic to enable interaction between UI and hardware with the user button.
Develop the low-level backend in GHS MULTI IDE
The following instructions guide you through the process of developing the low-level backend functionality needed by our application:
- Create new C++ source and header files and name them
deviceinterface.cppanddeviceinterface.hrespectively. Save these files in theBACKEND_DIRdirectory that you added in the earlier section. - Right-click application.gpj and select Add File into application.gpj to add the newly created files into the application sub-project file.
- Right-click
deviceinterface.hin the project manager and select Edit. Replace its contents with the following:#ifndef DEVICEINTERFACE_H #define DEVICEINTERFACE_H #include <qul/signal.h> #include <qul/singleton.h> #include <qul/eventqueue.h> typedef int HWButtonEvent; class DeviceInterface : public Qul::Singleton<DeviceInterface>, public Qul::EventQueue<HWButtonEvent> { public: Qul::Signal<void(int button)> buttonEvent; void onEvent(const HWButtonEvent &inputEvent); void toggleLED(); }; #endif //DEVICEINTERFACE_H
The header declares the
DeviceInterfaceclass, which inherits from Qul::Singleton and Qul::EventQueue. It also declares thebuttonEventSignal and theHWButtonEventevent type. This allows the Singleton object instance to be globally available. It provides an interface between C++ and QML, to emit the changed signal on receiving theHWButtonEventinput event. For more information, refer to Defining Singletons in QML and Transferring data from Interrupt Handlers to QML. - Similarly, replace the contents of
deviceinterface.cppwith the following:#include "deviceinterface.h" #include "boardutils.h" void DeviceInterface::onEvent(const HWButtonEvent &inputEvent) { buttonEvent(inputEvent); } void DeviceInterface::toggleLED() { BoardUtils::toggleLED(); }
- Create a new C++ source and header files pair and name them
boardutils.cppandboardutils.hrespectively. Save these files in theBACKEND_DIRdirectory and add them toapplication.gpj. - Replace the code in
boardutils.hwith the following:#ifndef BOARDUTILS_H #define BOARDUTILS_H namespace BoardUtils { void configure(); void toggleLED(); } // namespace BoardUtils #endif //BOARDUTILS_H
- Add the RH850-D1M1A-specific implementation of
BoardUtils::configure()andBoardUtils::toggleLED()toboardutils.cpp:#include "boardutils.h" #include "deviceinterface.h" #include "r_typedefs.h" #include "r_bsp_hmi_api.h" #define LED_NR 0 #define LED_BRIGHTNESS_ON 100u #define LED_BRIGHTNESS_OFF 0u void button_handler() { DeviceInterface::instance().postEventFromInterrupt(0); } namespace BoardUtils { void configure() { R_BSP_HMI_Init(); R_BSP_SetButtonCallback(BSP_BTN_CENTER_PRESS, button_handler); R_BSP_HMI_SetLed(LED_NR, LED_BRIGHTNESS_OFF); } void toggleLED() { static bool isOff = true; R_BSP_HMI_SetLed(LED_NR, isOff ? LED_BRIGHTNESS_ON : LED_BRIGHTNESS_OFF); isOff = !isOff; } } // namespace BoardUtils
The configuration function calls BSP-specific initialization functions from the RGL library for the user LED and button. It then registers
button_handler()as the interrupt request handler for the user button events. The interrupt request handler propagates the low-level interrupt events to the QML context using the DeviceInterface Singleton object. - To properly configure the RH850 LED and button, change
main.cppto include theboardutils.hheader and to callBoardUtils::configure()after the normal platform initialization:#include "boardutils.h" ... int main() { Qul::initHardware(); Qul::initPlatform(); BoardUtils::configure(); ... }
- Finally, add the RGL library sources needed for LED and user button interaction to
application.gpj:${SDK_DIR}/vlib/bsp/board/d1mx_mango/src/hmi/r_bsp_hmi_knob.c${SDK_DIR}/vlib/bsp/board/d1mx_mango/src/hmi/r_bsp_sys_hmi.c${SDK_DIR}/vlib/bsp/hmi/src/r_bsp_hmi_main.c
Integrate UI and backend in Design Studio
Use the DeviceInterface Singleton object from Design Studio, to access the low-level backend functions that you implemented in the earlier section.
- Open your project in Design Studio and select the Connections pane.
- Click + in the Connections tab to add a new Connection, and set
DeviceInterfaceas Target andonButtonEventas Signal Handler. Right-click the new connection and select Open Connection Editor as shown below: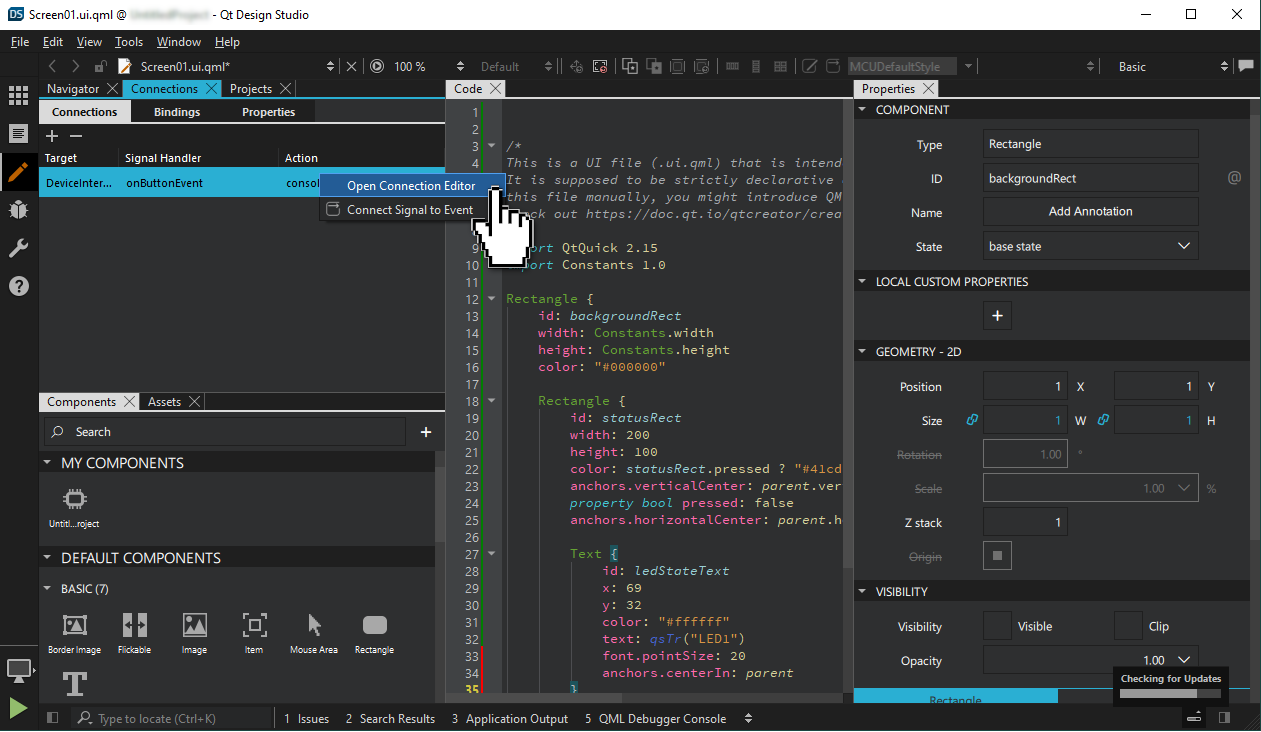
- Add the following code in the Action field:
{
    statusRect.pressed = !statusRect.pressed
    DeviceInterface.toggleLED()
}
This is the QML event handler for the
buttonEventyou defined earlier. Now on press of the button, the event propagates to the QML context, which changes thestatusRect.pressedproperty. This results in changing the color of an UI item. - Use a text editor to change
yourproject.qmlprojectto generate the necessary C++/QML interfaces needed for the singleton object:InterfaceFiles { files: ["C:/path/to/BACKEND_DIR/deviceinterface.h"] }Change the
BACKEND_DIRpath to the directory containing thedeviceinterface.hfile.For more information, refer to QmlProject InterfaceFiles.
Your application is now ready. Run the qmlprojectexporter tool to regenerate C++ sources as you did earlier and rebuild your GHS MULTI project. Flash it to the RH850 board to test that everything works as intended. Next, you can try to experiment and add support for another LED.
Available under certain Qt licenses.
Find out more.